- Run the base cardstock through a Xyron machine (you could also use spray adhesive, this is just less messy!) and then peel away the protective sheet to reveal the sticky cardstock underneath.
- Randomly snip shards of coloured cardstock and apply to the sticky side of your cardstock (leaving space in between each piece for the “grout”).
- Once you have all the shards of card stuck in place, sprinkle silver embossing powder over the entire piece and shake off the excess powder.
- Using the brush, carefully brush any excess powder off the coloured shards of card and emboss thoroughly.
- Cover the entire piece with Versamark ink, (make sure you put the lid back on the Versamark so that any flying powder doesn’t end up in the pad) then sprinkle card with clear embossing powder and heat.
- She then completed the card by adding a stamp from the Riveting hostess set!
Tuesday, August 28, 2007
Mosaic Card by Trish
Posted by
Sharlene
on
8/28/2007
0
comments
![]()
Tuesday, August 21, 2007
Cute card from my friend Kim Rice!!
By then splitting the central piece of cardstock into 3 sections she has given it a totally different feel and has made a simple card very appealing to the eye.
Leaves Awash wheel (pg 76)
Words of Wisdom (sorry, this is not available in New Zealand)
Kim Rice, San Diego
DID YOU KNOW?
That your eye is more naturally attracted to uneven numbers/items? Start looking out for professional designs and patterns, they are typically done with uneven numbers to appeal to the majority. Use this knowledge in your stamping and scrapbooking to make your creations more aesthetically appealing.
Posted by
Sharlene
on
8/21/2007
0
comments
![]()
Labels: card
Tuesday, August 14, 2007
Cool Stampin' Up On-line Colour Combination Website
If I haven't already told you about this awesome site, then check this out:
http://www.scraptitude.com/colorcombo/
Simply choose your main colour and 1 or 2 more colours and then hit select and you will get more colour combos that you know what to do with! I like to play around with it, I've found some really amazing combinations that I would never have thought of on my own ...
Posted by
Sharlene
on
8/14/2007
0
comments
![]()
Labels: technique
Sunday, August 12, 2007
UPCOMING CLASSES ...
Hi ladies, just a reminder about my monthly "$2 card" sessions - the next ones are on September 30th and October 28th. Feel free to just drop in any time between 1pm and 6pm, but if you could please let me know if you are planning to drop by so that I can make sure to have plenty of card cut and prepared.
If you can't be there but would like to receive one of each of the 6 cards, let me know ahead of time and I will make them up for you on the day and ship them off to you for just $14 (includes $2 extra for preparation and shipping). This is a great way to get ideas if you can't make it on the day.
Isn't this little guy so cute?
We did a number of cards with stamps from the new Spring mini catalogue at our July $2 cards!
Posted by
Sharlene
on
8/12/2007
1 comments
![]()
Saturday, August 11, 2007
Dying Grosgrain Ribbon
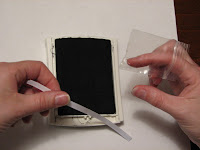
Have you ever been frustrated when you can't find the exact colour of ribbon to match your card or scrapbook page? Don't worry - just die (whoops, I mean dye!)

Posted by
Sharlene
on
8/11/2007
0
comments
![]()
Labels: technique
Sunday, August 05, 2007
Stamp-a-ma-jig!!
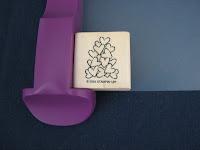 3. With your plastic imaging sheet still snugly in the corner, ink up your hearts stamp, and then stamp onto your plastic imaging sheet (making sure that your stamp is also pressed into the corner)
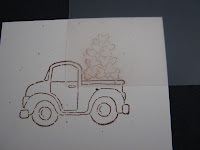 4. After you remove your stamp, you will have a stamped image on your plastic sheet. Move your plastic sheet around until your hearts are exactly where you want them to stamp in the back of the truck.
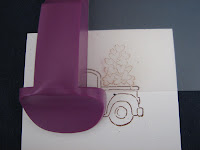 5. Once you have your image exactly where you want it to stamp, then you can push your stamp positioner back into place up against the corner of your plastic imaging sheet.
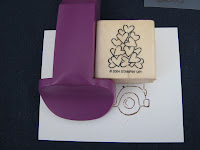 6. Remove the plastic imaging sheet, keeping the stamp positioner exactly where it was. Re-ink your hearts and you can stamp onto your cardstock (taking care that you keep the stamp tucked into the corner of your stamp positioner)
 7. Your hearts are now placed exactly where you wanted them and are ready for you to colour and finish your card! Great job!!!
Simply wipe your plastic imaging sheet with a tissue and a little Stampin’ Mist to clean it off ready to use again and again …
Posted by
Sharlene
on
8/05/2007
0
comments
![]()


