Showing posts with label scrapbook. Show all posts

Thursday, July 29, 2010

A MUCH YOUNGER TIGER …

 Cassie Tiger layout

Sorry for the shadows on the photo, but I wanted to share one more layout with you.  This is our Tiger when he was still just a “teenager”.  This was the first time that he met Michelle’s dog, Cassie, so it was really entertaining to watch as Tiger “King of the Jungle” took on this huge dog with all the confidence in the world, at least until he got up close to Cassie, then Tiger wasn’t quite so confident any more …

I’m really loving the Autumn Traditions designer paper from the Autumn-Winter mini catalogue, it’s just fabulous for more masculine looking layouts and cards with all those autumn type colours. 

scrunched ribbon
The ribbon I added by putting a strip of Sticky Strip across my page, and then scrunching and sticking the ribbon all the way across.  A really simple way to add a little detail to a simple page for a bit of oomph.

torressiggy

Sunday, July 18, 2010

JUST A LITTLE LATE … 2 1/2 YEARS LATE THAT IS …

parler First Day of School layout

I actually got to do some scrapping, just for myself this weekend with a fabulous friend that I don’t get to catch up with nearly enough (hi Cherie!).  I actually got 2 pages and a double layout done, so I was rather pleased with myself for not spending so much time talking that I didn’t get anything done like normally happens!!

It’s a little late since Parker is now 7 1/2, but these pictures were taken on Parker’s first day of school 2 1/2 years ago!   I picked the primary colours of red, yellow, and blue to mimic the colours in Parker’s backpack, and because they just scream “primary school”, don’t they?

I just love how easy the Big Shot Timeless Type Alphabet makes doing headings – just roll it through the Big Shot and your alphabets are cut and ready to stick on the page!!  It doesn’t get easier than this!!! 

I’m hoping to get some more scrapping done this week, so hopefully I’ll have some more to share with you soon.

Keep on scrappin’!

torressiggy

Wednesday, April 07, 2010

PARKER BROKEN! A little Blog Hop Action for you …

Happy Wednesday everyone!

I hope you’ve grabbed your coffee and are comfortable as you’re in for a real treat – over 25 blogs filled with loads of great ideas made with projects from the brand new Autumn-Winter Mini catalogue!!  It’s going to blow your mind!!

If you have dropped into my blog and wonder what’s going on, you’ve been lucky enough to stumble into a ESAD blog hop!  Otherwise you might have dropped into from the awesome Sharlene Meyer.

What is ESAD?

ESAD stands for Extra Special Australasian Demonstrators and it is an online group just for Australian and New Zealand demonstrators for Stampin’ Up!

We so love what we do and not only do we love to share it with our customers, friends and wonderful blog visitors but we share our love for what we do with each other as Demonstrators. We run swaps, challenges, tutorials, product know how and cyberstamps and we are always there to help and support each other when its needed.

So if you are a Stampin’ Up! Demonstrator located in Australia or New Zealand then please feel free to click here to join our wonderful group.

MY PROJECT TODAY
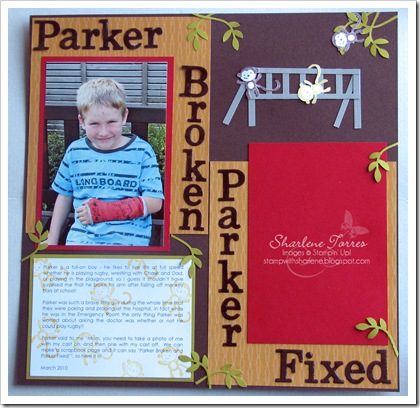
parker broken page 

My “baby” (he’s 7 and hates that I call him my baby) fell off the jungle gym at school last month.  He’s a full-on kid, so I guess it shouldn’t surprise me!  It did surprise me that the only thing he was worried about at the ER was asking the Dr if he could still play rugby with his cast on!!

To create the titles I used the fabulous new Big Shot Timeless Type alphabet - boy did that save me a heap of time compared to my old way of stamping or printing and cutting out letters!  I would totally recommend the alphabet for all your scrappers out there – it’s awesome!!

crystal effects letters I wanted my letters to have a little oomph, so I added a layer of Crystal Effects to each of them to give them a great dimensional and glossy finish. I really like the way they turned out.

The designer paper you can see in my page is from the new Autumn Traditions pack.  This pack is really great for more masculine pages as there are heaps of great colours in it – even the fabulous new Soft Suede which is already a huge hit with me!
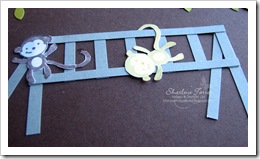
monkey bars Of course I had to add some monkey bars to the page just so I could use those cute little monkeys from the new Fox & Friends stamp set!  If you haven’t used the new acrylic stamp sets, you really need to try them.  I was adamant that I wasn’t going to use them, but after trying them I really love them!  They are the same rubber and foam stamps we are used to, the only difference being you stick them to an acrylic block when you want to use them, and then peel them off when you are finished.  Same fabulous images but a huge space saving in the craft room since a whole set of even 24 stamps fits inside the cute DVD cases they come in!!

If you are wondering why there is no photo in the “Parker Fixed” spot, it’s because he’s only getting his cast removed this morning, so we’ll have to update the page in a day or so after we’ve taken the “after” photo …

Updated to say:  I forgot to tell you about the BLOG CANDY!  Shame on me! 

We are again offering Blog Candy for our Blog Hop. What you need to do is complete the blog hop until you get back to me. Once you’ve visited and commented on every blog then you will need to email me at stampwithsharlene@hotmail.com and tell me your name and where you are from and I can then put your name into the draw for the blog candy.  There will be one winner from New Zealand and one winner from Australia.


Now you need to go and check out the talented Shirley McAvoy to see what treats she’s prepared for you!


torressiggy

Saturday, January 09, 2010

RAINBOWS END … 2008!

I should have been making dinner last night, but instead I was finishing up this page from when we visited Rainbows End a year ago!  Luckily Harry is a good cook and doesn’t mind too much coming home from work and then offering to make some dinner or else we would all go hungry …

I am just LOVING my new Circle Scissors – I can make circles in over 120 different sizes with just the one tool – how cool is that!  I used it here to create the circles for the accents in red and yellow on both pages. 

If you want to see how easy the Circle Scissors are to use, then call me to arrange a time and I’ll show you how easily you can make circles in sizes from 2.5cm all the way up to 15cm with just the one tool!!  The great news is that with Sale-a-bration at end end of January, when you spend $120 you’ll get a free set of stamps as well, so why not treat yourself to a Circle Scissors and mat for less than the price of 3 punches and be on your way to that free set of stamps …

rainbows end 1

rainbows end 2

Cardstock colours:  Green Galore, Pacific Point, Yoyo Yellow, Real Red, Basic Black.


torressiggy

Monday, January 04, 2010

A LITTLE LATE …

Oh you say, Sharlene’s already scrapped some photos from Christmas – how organised is she???  Well, I hate to admit it, but New Year’s Eve this year finally saw me scrapping some photos from Christmas last year …  Maybe my New Year’s resolution should be to get ahead on my scrapping??  I have some more photos from our Christmas in Auckland this year, so hopefully I’ll get those done before this time next year! 
 08 christmas page 1 

08 christmas page close
The bottom photo of the kids makes me laugh – it’s so real to life!  Mason dressed in girls clothing, Riley talking non-stop, Parker showing off, and Chase and Blake pretty much grinning and bearing it  …

08 christmas page 2

Stamps:  Snow Swirled, Jumbo Outline Alpla (on sale 50% off until Jan 24th!!)
Cardstock: Real Red, Old Olive, Ski Slope DP (retired)


Now I’m back off to help Harry clean out the garage so that we can organise our garage sale for early February!!  I have so much craft stuff to sell that I will have at least 2 tables just for me!  That also means at least 2 days of cleaning out my craft room … such is the life of a compulsive crafter!!

torressiggy

Tuesday, December 01, 2009

ESAD SUMMER MINI BLOG HOP!

If you’ve landed on my blog as you are exploring the Summer Mini Blog Hop, then you probably came by way of Ros’s blog here.  I’m sure you’re just buzzing about all the fabulous examples that you have already seen made with product from the brand new Summer Mini Catalogue – I know I am!!! 

Chase and Parker bath page

I put together a scrapbook page for you made with what I think is going to be my favourite set from the mini, I {Heart} Hearts.  This set is just so cute – I see so much potential for it (in fact I’ll share a card that I made with it tomorrow!)

My son, Chase, is probably going to have a fit when he sees these photos since they were taken when he was 5 (and he turned 12 last week).  It’s obviously not “cool” to have bath photos of you on the internet when you’re 12 … but the boys were soooo cute when they were this little …

heart button polka dot ribbon

Did you notice the FABULOUS polka-dotted ribbon and those scrummy bright new new buttons?  There are so many awesome things available in the brand new Summer Mini – what do we buy first?  Check out my product shares on offer for all sorts of options to make your dollar stretch further.

ESAD stands for Extra Special Australian Demonstrator (they started before Stampin’ Up! hit New Zealand, but they are very friendly even to us Kiwis!).  If you are a Australian or Kiwi Stampin’ Up! demonstrator then you can join in the ESAD Yahoo group by clicking this button

join

Do you want to go in the draw for some fabulous blog candy?!  Then stop and comment on all 30 of the blogs on this blog hop, then e-mail Leonie at leonie@stamp-a-latte.com and let her know how much you enjoyed it!

Thanks for stopping by to see me, I hope to see you back again soon!  Make sure you swing on over to Sonia’s blog to see what she’s been creating with those cute butterflies …

torressiggy

Thursday, October 29, 2009

TWOTHLESS (AKA TOOTHLESS)!

twothless page

I couldn't believe it when both of our TWO boys lost TWO teeth each in the same week - Parker's were even TWO days apart!  So of course I had to scrap a picture and some journalling about it all ...

You can't make it out very clearly because of the flash reflecting on the plastic overlay, but the smaller More Mustard square is actually a shadow box with Parker's first tooth in it.

Supplies used:
Stamps:  Circle Circus, Big Deal Alphabet
Cardstock/paper:  Tangerine Tango, Chocolate Chip, More Mustard, Very Vanilla, Haiku designer paper.
Inks:  More Mustard, Versamark
Accessories:  Jumbo chocolate brads (from Spring mini) Clear embossing powder, dimensionals

Thanks Megan for your inspiration for the beginning of this layout!!

Keep on scrapping!

torressiggy

Monday, August 31, 2009

A TOUCH OF PARIS IS GOOD FOR THE SOUL ...

I'm LOVING the new Parisian Plaza specialty papers in the mini catalogue, not only are they gorgeous to look at, they have all that texture as well!  Throw in the fact that they are heavier than our regular cardstock and so awesome for doing 3D items and it's a done deal - how can anyone not love them!?!

I demonstrated a scrapbook page at a workshop on Saturday with a fabulous group of ladies (Hi Kathy!); so I thought I would share it with you all as well.

Scrapbook pages don't have to be difficult or time consuming to be eye-catching.  Sometimes the simpler ones are the best as the focus is on your photos rather than on your embellishments!  Kathy as my hostess on Saturday got to keep the samples from our workshop, so I'm sure she will be able to find photos to add to this layout and it will be a great addition to her scrapbook album!

Family Parisian Paper page 

Stamps:  Lovely Letters Alphabet, Defining Life Alphabet and Life Definitions ("together" tag at the bottom of the page)
Cardstock:  Chocolate Chip, Sahara Sand, Baja Breeze, Whisper White, and Parisian Plaza DP
Accessories:  Pretties Kit - flowers and rhinestone brad (I coloured the flowers Baja Breeze to match), Eyelet border punch

Keep on scrapping!
Sharlene

Sunday, August 16, 2009

REMEMBER THE LONG-LOST DAYS OF SUMMER?

Circle Circus Parker
Well, as you know from yesterday's posting, at 9:30 last night I was just started on the 2 pages that I needed to do for my Nana's scrapbook page.  I managed to get 2 simple pages done in just over an hour and I'm really pretty happy with that (it means that I don't have to face the wrath of Michelle for not getting them done!)

This is one of the pages I did.  It's from our Christmas holidays this year - Parker in a moment of intense concentration trying to figure out how to use one of the Christmas pressies ...

Stamps
:  Circle Circus
Colours:  Tempting Turquoise, Riding Hood Red, Night of Navy, Whisper White
Accessories:  Clear buttons, white EP, scallop edge punch, non SU narrow ribbon

Keep on stampin'!
Sharlene

Sunday, June 21, 2009

SCRAPBOOKING MADNESS NEXT FRIDAY!

Sorry it's been so long between posts, but Megan and I did a scrapbook class at the WOW Women's Conference yesterday and with planning and cutting for that on top of everything else going on at the moment (including the big surprise that I'll be able to tell you about very soon), there just never seems to be enough hours in the day ...

Anyway, it's already been 3 weeks since our last Scrapbook Madness class and crop!  Time is really flying!  Make sure you can me in the next day or so to confirm your spot for next Friday night (26th). 

SCRAPBOOK MADNESS:
June 26th, 6 - midnight (or as long as you can last!)
Class: $20 - includes crop afterwards (6 - 8pm)
Crop only: $10
(8 - midnight)

During the class you will complete TWO LOTS OF 12 x 12 DOUBLE PAGE LAYOUTS (a total of 4 12x12 pages!)  Then you can stay for the open crop and get even more scrapping done - the perfect girl's night out to get some of those pictures on pages!!  Use all our stamps, inks, punches, idea books, and us - we're here to help you get those photos on your pages!!


I have even got in some personal scrapbooking this month that I haven't shared with you yet, so I'll share that right now and try to get some more regular blogging in this week ...

Pink Pirouette Scrapbook 1Pink Pirouette Scrapbook 2

Pink Pirouette Scrapbook flowerThis is a close-up of the flower.  I love the fact that our Pretties Kit flowers are white and they are so easy to stamp on!  I stamped on the flower with Kiwi Kiss ink and then inked up the smaller flower with a Real Red reinker (I don't have a Riding Hood Red reinker yet!)

There will be photos on these pages shortly (I am wanting to do pictures of my Nana on these pages - I just have to get them printed off!).

Cardstock / Paper:  Bella Rose DP, Pink Pirouette textured card, Riding Hood Red, Old Olive, and Whisper White cardstock
Accessories:  Eyelet Border punch, Pretties Kit, Red taffeta ribbon

Tuesday, June 02, 2009

... REALLY, I'M NOT MISSING IN ACTION ...

I know it seems like I have been gone for ages, but I'm really here and stamping, but between lots of classes and workshops and preparing projects for our BIG SURPRISE (which you'll heard about very shortly), I've just been so swamped that I haven't even had time to blog (now that is really sad!) ...

Anyway, I have a few minutes in between feeding kids (they have a teacher only day today), and heading off to do lots of chores, so I thought I would share a few of the things I've been up to over the past week.

scrapbook pages May 09
Firstly, here is the double-page spread that I did for the scrapbooking class Michelle and I taught class last Friday night.  You can't see the textured, but the textured cardstock just really takes your layouts up a notch by adding that extra layer of oomph!  This was based on a layout that our wonderful Megan showed me at her place (thanks Megan!).

The class was loads of fun and we are going to do it the last Friday night of every month, so book in early to make sure you are saved a seat!  We will do a class from 6-8pm where you will make 2 double-page 12x12 album pages (that's 4 12x12 pages completed in 1 evening!), and then from 8 til midnight we'll have an open crop where you can finish off pages and create until your heart is content (with a little help from everyone else if you need it!).

$2 cards May 09
Secondly I thought I would share 3 of the 6 cards that we made at $2 cards Sunday afternoon and last night.  It was a packed house on Sunday afternoon, but pretty quite last night, so next month you might want to try Monday instead if you want to be able to get a seat when you want one ...

Happy stamping!
Sharlene

Thursday, April 23, 2009

FEELING A LITTLE SCRAPPY?

Urban Garden Layout

I thought I would share a scrapbook layout that I did at a workshop this week.  I love showing how easy scrapbooking can be - especially with all the fabulous Stampin Up designer papers and accessories that coordinate so well together! 

Believe it or not, but there are NO stamps on this page!  It's just cardstock and paper (I used a cut-out flower from the Urban Garden designer paper as an embellishment in the corner). 

This literally took 10-15 minutes to put together!  A very simple page that you could easily take up a notch or 3 if you have more time than I did.  I would add Dazzling Diamonds on my flower embellishment, and some yummy hodge podge on the page to finish it off ... yummy!!

Stamps:  None!
Cardstock/papers:  Urban Garden designer paper, Basic Gray, Whisper White, Kiwi Kiss, textured Not Quite Navy
Accessories:  Eyelet border punch, Kiwi Kiss ribbon, Cherished rub-ons (yes, I know they are retired, but I haven't got my new ones yet and my hostess wanted to see how rub-ons worked ...)

Friday, March 27, 2009

CHRISTMAS AGAIN?

christmas 6x6 pageI'm a little slow on scrapbooking photos (more like a LOT slow actually!), but I just loved this photo of my 3 boys from last Christmas. Both Chase and Parker are a bit obsessed with UB Funkeys (electronic creatures that open up computer worlds), so when Parker got a brand new Funkey for Christmas I caught this shot of excitement from the boys and Harry looks a little resigned to the fact that he will be getting less computer time for a while as the boys experiment with their new Funkey ...

Stamps: Baroque Motifs
Cardstock: Riding Hood Red, Kiwi Kiss, Basic Black cardstock
Ink: Whisper White ink
Accessories: Rub-ons, Scallop Edge punch

Friday, January 23, 2009

LITTLE SKATEBOARD DUDE!

little skateboard dude

If you have been wondering where I am for the past few days, we decided to take a couple of days to go to the beach while the weather is great and the boys are still out of school, so while I haven't been blogging, I did do a little stamping and scrapping. I have a scrapbook page to share with you today, and then will be back with a finished 3D item tomorrow that is soooo cute I know you will love it!

This is the one page that I managed to get done over the past few days (too much reading and mellowing and not enough creating!)

We hadn't heard anything about a skateboard until 2 days before Christmas when Parker announced to Santa at the mall that he wanted a skateboard (nothing else - just a skateboard!). The next day he bought it up in the car again on the way to Auckland, so we had to stop at The Warehouse to get one (talk about last minute!). Thankfully they not only had a skateboard, but it also was a Speed Racer skateboard (Speed Racer is Parker's favourite cartoon character, so it was a massive find to get a skateboard with him on it!). Parker spent Christmas morning playing on his skateboard and trying to learn some tricks.

Stamps: Headline Alpha (now retired, but I still love it!)
Card/Paper: Real Red, Whisper White, Tempting Turquoise, Wild Wasabi, More Mustard, and East Coast Prep DP
Extras: Tempting Turquoise Brads, 1/2" punch

It's been absolutely ages since I have scrapped anything, so hopefully this will be the beginning of lots more scrapping ...

See you tomorrow!!

Saturday, November 22, 2008

CUTE AS A BUG!

cute as a bug scrapbook layout

This is a layout that I did in a workshop today.  As I normally do, I started with my designer paper for colour inspiration and then pulled the colours from the paper for the rest of the layout colour scheme.  Don't you LOVE the fact that all our designer papers are also in the same 48 exclusive colours that everything else is??  If you are "colour challenged" like I can be a lot of the time, it makes your life sooooo much easier ...

I used the markers (which are only available individually for just a few more days) directly on the bug stamp to colour him in the same Old Olive and Tempting Turquoise as my cardstock.  I really wanted to add some bling and put some Dazzling Diamonds glitter on the dragonflys, but I ran out of time, so you will just have to just pretend that they are lovely and sparkly!

If it looks a little crooked, it's because this isn't actually stuck together, this was just all the pieces laid together to see how it looked before I took it to my workshop to actually put it together and show the lovely ladies how easy it was to do.  Now I just have to make myself a similar page (my hostess got to keep the original), put some photos and journalling on it, and then it's ready to go in an album.

Have a fabulous day!!!
Sharlene

Wednesday, September 17, 2008

SCRAPPIN' FOOL ...

If you have wondered why I have been so quiet lately, it's because I've been preparing for the "Year in a Day" scrapbook class that we are doing in November! I haven't sat down and scrapped for ages, so it was a lot of fun to be able to sit and play again. Now I just have to get scrapping my own photos instead of for classes ...

Anyway, I thought I would share a couple of the pages I have come up with over the past week or so. These are just 2 of the 12 double-page spreads that you will be creating at our "Year in a Day" scrapbook class.

If you would like to scrapbook but either don't have the time, or don't know where to start, then this class is for you.

You will make a 2-page spread for each month and go home with a completed album ready for you to just stick your photos in and it's done! How about that - a whole scrapbook completed in just 1 day?

scrapbook examples

Date: 15th November, 2008
Time: To be advised
Cost: $45 for first set of pages, $40 each for second set (cost includes everything to create the pages, it does not include an album. Albums can be purchased prior to class through me if you wish)
Location: To be advised

You will complete 25 6" x 6" pages, enough to fill a complete album in one day! During the day you will complete a title page, and a double-page spread for each month from January to December. Then all you will have to do is stick your photos in when you get home or wrap it to give as a gift. It's so super easy you will wonder why you haven't done this before!

E-mail me at stampwithsharlene@hotmail.com, or call me on (06) 753-5337 to secure your spot.

Tuesday, May 20, 2008

RETURNING TO THE 1940's

IMG_6575 copyI have had this picture of my Grandparents when they were dating back in the 1940s for a while, and kept meaning to scrapbook it, but for some reason it just never seemed to happen.  Well this past weekend I was showing the "girls" how to colour black and white photos with Stampin' Pastels and used this photo to demonstrate.  Well since I was already half way there, I finished up the rest of the page last night. 


Although it's one of the simplest pages I have done, I really like it.  I think the simplicity of it helps captures the feel of a simpler era when women wore hats and high heels and men wore a suit when they went on a date.  How different it is from today ...


The flowers and pearls are from the Pretties kit (the flowers were coloured with aqua pen and watercolour crayons), and the stamp the large stamp from the awesome Baroque Motif set.

Friday, December 14, 2007

"Sweet" Scrapbook page

This is a scrapbook page that I demonstrated for a workshop last night. Very simple, but I really like the way it turned out. It was inspired by a lovely lady, Sarah K, who is a demo in Australia!


Stamps: Headline Alphabet
Cardstock / Ink: Tempting Turquoise, Regal Rose, Close to Cocoa
Designer Paper: Loves Me (new in Summer mini)

The heart is a chipboard accent piece from the On Board Accents pack (see page 136 of the catalogue). I sponged it with the Rose Red ink, then pressed into the Versamark pad. By using Heat & Stick powder on top of the Versamark powder, it turns into a glue when heated and gave the Dazzling Diamonds something to stick to! Much more sparkly in real life.

As you can see, the spiral punch (see the Summer mini catalogue) is fabulous for creating a film-strip type look by punching down both sides of your strip of cardstock.

The Loves Me designer paper used here gave me the inspiration for the colours as I simply pulled the cardstock colours from the designer paper (deep thinking went into that one!). This is when knowing all the SU cardstock, ink, and everything else matches makes your life SOOOOOO easy!!!

I'm on half days this week, and then off for a full 3 weeks, so be expecting lots of postings as I get time to play and experiment with all the cool stuff that I haven't had a chance to get my hands on yet ...